

Managing Existing Numbers
From the Inventory tab under the global view, you will see a list of all the phone numbers across all of your domains.
Management
From here select the number you want to manage, you can either select the number itself, or the edit button on the right hand side.
![]()
From here the phone number configuration panel will show up.

1 - Enable Time Frames: This turns the number into a TOD (Time Of Day) Number for time based configuration, see How do I configure time of day routing on phone numbers?
2 - Treatment: Sets the type of destination that this number will go to, unless you know exactly where it's going it's best to leave this as is for now and configure it once it's on the domain you want.
3 - Caller ID Prefix: This sets a prefix that shows on the end users phone when people call this number, for example, lets say you have a number pointed towards a group of sales people, and someone with the caller ID "01772 289728" calls the number. If you set the caller ID prefix to "Sales", then on the sales people's phone the caller ID will show as "Sales 01772 289728". This is useful if people in multiple groups want to know what group has been called before they answer the phone.
4 - Domain: Set the domain that this number is assigned to. This number will show under the inventory when in the domain view of the domain it is assigned to.
5 - Enable DDI: Manually toggle the number on off.
6 - Enable/Disable Date: Set a date for when the number is enabled/disabled. This is useful for when numbers are porting in/out as you can configure the number in advance and not have to worry about it.
NOTE: You might at this point ask the question "Why not just leave the number enabled forever, as it will only be active if it's on our SIP Trunks?". It's important to note that the platform will attempt to route numbers internally even if it's not on a SIP Trunk, for example, lets say one of your customers ports their number away and you try calling that number, if the number is still enabled on your platform it will attempt to route the call to where it is routed on the platform and not send the call externally.
7 - Notes: Put a note next to the DDI, this is just useful if you have a lot of numbers in one place and want to see what each is for at a glance.
Once you've assigned the number to the domain you want, you can select "Save". From here you might want to manage the numbers within the domain to route them to their designated users, for this see How do I configure phone numbers within a domain?
Bulk Management
In most cases you probably want to assign more than 1 number to a domain, and you don't have to do each one one by one.
First select the numbers you want to configure in bulk by clicking the tick boxes to the left of each number (you can select every number in the current list by selecting then tick box at the very top).
 Once you've selected the numbers you want, a "Bulk Edit" button will appear, click this to bring up the Bulk Number Configuration panel.
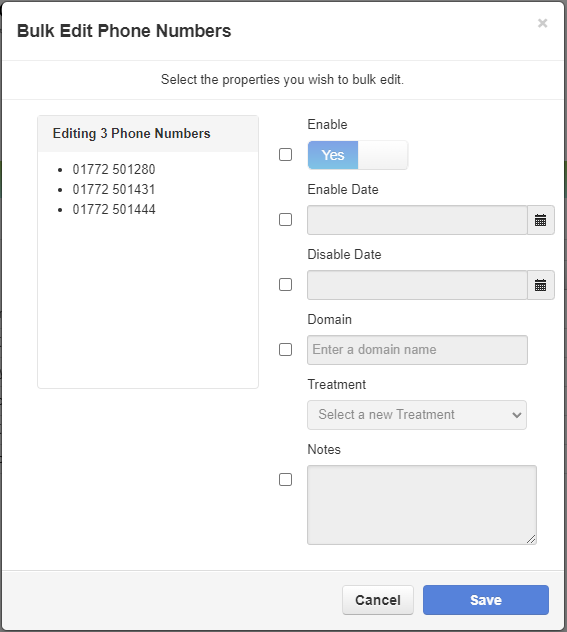
You will notice that the fields on this box are the same as the singular page, with some slight differences.
Each field has a tick box next to it, if you leave the tick box unticked, then it won't change anything, whereas ticking the box will overwrite what is currently on all the selected numbers with what you pick.
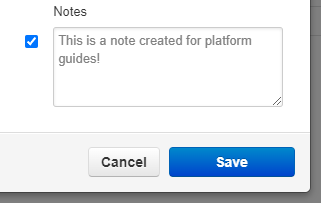
Once you've changed what you want, press the save button and it will apply all changes to the numbers you selected.
Filtering
When you end up with a lot of numbers, you will inevitably reach a point where managing every number at once from a single window is cumbersome.
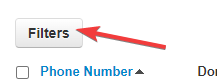
To get around this you can filter what numbers are shown in the list.
TIP: Another way to organise your numbers is to use a storage domain, this is a domain that you don't use for end users and instead just assign all numbers that aren't currently in use, this way you can filter for numbers only on this domain to make sure you don't touch your end user's number when assigning numbers out.

1 - Phone Number: Search for all, or part of a phone number. Due to being able to search for part and not all you can use this to filter what area codes are shown.
IMPORTANT: Phone Numbers are stored in the system in E.164 format, but they are shown to the user localised for their country. You have to bear this in mind when filtering, as it will require you to filter it based on this format. For example, the number "01772 121212" is store as "441772121212", this means when filtering, if you wanted to search for all numbers starting with "01772", instead of filtering for "01772" you should instead filter for "441772".
2 - Domain: Search for numbers assigned to a certain domain.
3 - Treatment: Search for all numbers set to a particular treatment.
4 - Destination: Search for numbers set to a specific destination.
5 - Status: Set the option to filter out Disabled, or Enabled number.
When done, click the "Filter" button.

Now only the numbers you filtered for show in the list, you can see what filters are currently enabled as each one shows as a blue tag next to the "Filters" button.
You can remove filters by clicking the "x" button on the right hand side of each filter tag.
Deleting A Number
To delete a number, click the red "x" button to the right of the number, this must be done in the global view and not the domain view.

NOTE: Deleting a number in the portal does not cease the number from your SIP Trunks, to fully cease a number off speak with your SIP Trunk provider.
Adding New Numbers
Once you have ported a number in to your SIP Trunks, or bought a number from your SIP Trunk provider, it will not show in the portal automatically, you first need to add the number.
To start this click the "Add Phone Number" button:

Now you will see the new number configuration panel pop up:

From here enter the number you want to add to the portal, along with any assignment/configuration you want for the number, then click Save.
WARNING: Just like with filtering, Phone Numbers are stored in the system in E.164 format, but they are shown to the user localised for their country. This means when adding new numbers you MUST write them in this format, see the above picture, instead of writing "01772 288519", we wrote "441772288519". If you don't add your numbers this way, they will not work. If you have accidentally added a number incorrectly, you must first delete it then add it back with the correct configuration.

Once you press save, the number will show in your inventory, and is now routable.
Adding new numbers in bulk
On top of being able to add numbers one by one, you can bulk import numbers via spreadsheet.
First you will need a template, to get this click the "Import" button, then click "Download Template"

This will download a template in .csv format, to edit this template open the file in spreadsheeting software such as Microsoft Excel or Google Sheets.

From here fill out the columns with how you want to configure each number, then save the file.
Now you can upload the file by selecting "Browse" and searching for the file you just saved, then hit "upload".

The portal will now show you a preview of what you're about to upload, and will let you make some last minute edits to the numbers if something is wrong.
IMPORTANT: Importing a number that already exists in the portal, will instead overwrite that number with the new configuration you're importing.
Once done, click the "Import" button.

If done correctly, your new numbers will now show in the phone number list.
