

A call queue is similar to a ring group in that it is capable of routing calls to multiple phones at once, however Call Queues have much more functionality.
To begin, navigate to the Call Queues tab under the domain view, as in the above picture, then click "Add Call Queue". This will bring up the Call Queue configuration panel.
Creating a Queue
Basic

1 - Name: Set the name of the queue.
2 - Extension: Set the extension number of the queue.
3 - Warning Tag: When you create this queue, it will create a system user along with it to manage the routing (see Understanding The User for more information about system users). However, if you enter an extension number that already belongs to another user, it will overwrite that user. This tag will change from "New" to "Warning", like below:

4 - Department/Site: Set the department/site of the queue.
5 - Type: Set the queue type (see below for further breakdown of what these mean)
6 - Statistics: Enable this queue to show in the Insights reporting tool and dashboards.
Types:
Round-Robin (longest idle): Will ring the agent that has been idle (idle here refers to time since the agent was last on a phone call) for the longest, if they don't answer within a specified timeout, the next longest idle agent will be attempted. This continues until all agents in the queue have been attempted at which point the call will route to a configured timeout destination.
Tired Round-robin: Allows you to configure tiers of agents, agents in tier 1 will be attempted in same way as the above round robin, after all agents in tier 1 have been attempted then it will move to tier 2 (even if an agent in tier 2 has been idle longer than an agent in tier 1, tiered round robin will call all tier 1 agents before tier 2). After all tiers and agents have been attempted, the call will route to a configured timeout destination.
Ring All: This will ring all agents in the queue at the same time for a specified period of time, after this time has ended the call will route to a configured timeout destination.
Linear Hunt: This will attempt agents in a predefined order depending on their availability. Note that as this is based on availability it won't ring through all agents in order if an agent doesn't answer. Lets say you have 3 agents in a linear hunt group, and agent 1 doesn't answer the phone so the call routes to agent 2, if agent 2 doesn't answer the phone then the call will route back to agent 1 again. The call will only route to agent 3 if agent 1 and 2 are not available (i.e. logged out the queue or on a phone call).
Linear Cascade: This will cascade through groups of users until a configured timeout is reached, at which point the call is routed to a configured timeout destination. To understand this, imagine a 9 agents split into 3 groups of 3. Each group is configured to ring for 10 seconds. When a call comes in group 1 will ring for 10 seconds, then group 1 and 2 will ring for 10 more seconds, and finally groups 1, 2 and 3 will all ring together for 10 seconds.
Call Park: A park is a special kind of queue that does not contain agents, and does not ring any phones. Instead when a caller enters a call park they are placed on hold and users within the domain have to manually take the call from the park (there are a number of ways they can do this, either via star codes or the portal/web application).
This guide will cover Ring All, Round-Robin, and Linear Hunt. The other types will have their own articles as they are very complex.
Pre Queue Options

The pre queue options covers what happens whilst a caller is waiting for an agent to become available.
Note that this part of the configuration is fairly well documented within the portal itself, hover your cursor over the "i" symbol next to each option to see what it's for.
Below I will explain somethings not explained within the portal:
1 - Queue Audio: The options for queue audio are "Music on Hold" and "Ringback", this means you can choose whether the caller will hear music or a ringtone when calling the queue. Once the queue is configured this cannot be changed via the configuration panel, instead, setting "Ringback" just imports an audio file into the queue's music on hold of a ringtone. To switch from Ringback to Music, go into the queues music on hold and delete the ringback file, to switch from music to ringback you need to upload a ringtone file into the music on hold.
2 - Allow Callback Option: This is quite a useful but complex feature, setting this to yes means that once the max expected wait time is reached, the caller will be prompted if they'd like a call back instead of waiting in the queue, if they say yes then the system will clarify their phone number and end the call.
However, the call doesn't leave the queue and instead keeps their place in the queue for up to an hour until the call is answered by an agent, at which point the system notifies the agent that the caller requested a callback and initiates a call to the number that the caller specified.
In Queue Options
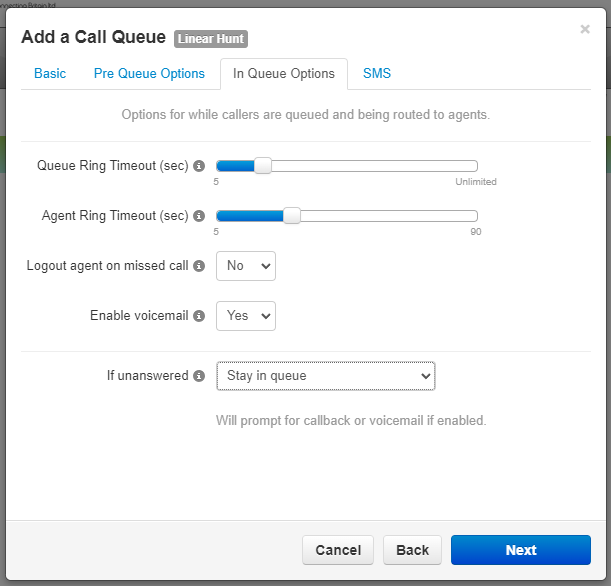
Like with "Pre Queue Options", the "In Queue Options" are fairly well documented, hover over the "i" symbol next to each field to read about what it's for.
1 - Agent Ring Timeout: Note that this is not here on queues with type "Ring All", this is because due to the fact that all agents ring at the same time, agent ring and queue ring are effectively the same thing.
2 - Voicemail - If "Enable Voicemail" is set to "Yes", but "If unanswered" is set to "Stay in queue", then once the queue reaches it's timeout it will prompt the caller if they'd like to stay in the queue or leave a voicemail. If "If unanswered" is set to "Send to voicemail", then the caller will go to voicemail at the end of the queue time out without being given the option to stay in the queue.
Note that voicemail in this regards is stored on the inbox belonging to the queues System User.
SMS
The SMS tab is not currently functional, it is a work in progress feature coming in the near future and can can for now be ignored.
Queue Management

Now that a queue has been added, it shows in the queue list.
1 - Queue List: A list of all queues that includes some basic information about each queue.
2 - Callers In Queue: See how many people are waiting in the queue, click the number for more information and tools regarding the waiting callers.
3 - Agents Available: See how many agents are in the queue and how many are available. Click the number to configure the queue's agents.
4 - Edit Agents: Click this button to configure the queue's agents.
5 - Edit MOH: Click this button to edit the queue's music on hold.
Callers In Queue

Clicking the number of callers in the queue will bring up the above panel showing you a list of all callers.
1 - Caller ID: See the caller ID of the caller in the queue.
2 - Status: See the status of the caller.
3 - Duration: How long the caller has been waiting.
4 - Prioritise: Clicking this will move the selected caller to the front of the queue.
5 - Transfer: Allows you to transfer the call out the queue to somewhere else, or pickup the call yourself.
Edit Agents

1 - Agent Status: This will either be Offline (grey), Available (green), or Unavailable (red). Offline means that either the agent is logged out or none of their devices are registered. Unavailable means the agent is on a phone call.
2 - Agent List: A list of the agents configured within the queue and some basic information about their configuration.
3 - Edit Agent: Edit the configuration of the specified agent.
To add agents, click the "Add Agent" button.
Add Agents
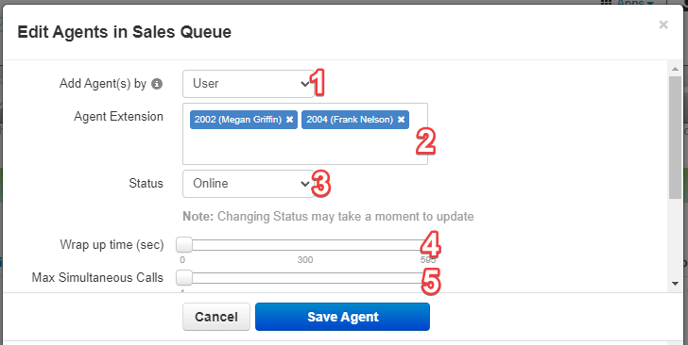
1 - Add Agents By: This lets you specify if you want to add users or devices. Adding agents as a user will add all of the user's devices at once. Adding agents by device lets you specify specific device you want to add.
2 - Agent Extension: Specify which users/devices to add to the queue.
3 - Status: Set what status the agents will be added as.
4 - Wrap Up Time: Once an agent finishes a call, the wrap up time is a set period of time that the queue will wait before putting another call through to the agent.
5 - Max Simultaneous Calls: Configure how many calls the user/device can take at once.
IMPORTANT: Queues will ignore call waiting configured on phones, if you have call waiting but "Max Simultaneous Calls" is set to 1, then the queue will still only put 1 call at a time through to the agent.

6 - Queue Priority: This sets the priority of the agents. This is purely for scenarios where a user is in more than one queue and you want them to prioritise a specific queue. Imagine a user is in 2 queues one called Sales and another called Service. If a call comes into both queues at the same time, then the user will be given the call from the queue where their priority is highest.
7 - Request Confirmation: When an agent answered the call, if this is ticked then a message will play saying "Press 1 to accept this call" and if 1 is not pressed then the call is dropped and passed to the next agent. Mainly used with offnet agents (see below).
8 - Auto Answer: If auto answer is enabled then calls to this agent from this queue will be automatically answered without the agent's input.
Offnet Agents
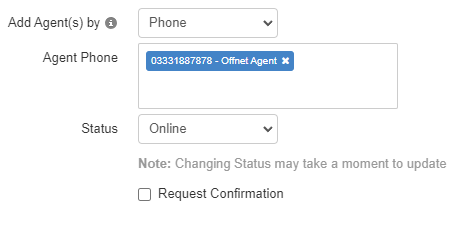
If you set "Add Agent(s) by" to "Phone" you can enter a full phone number into the box and create what is referred to as an "Offnet Agent". This means you can route calls via queues to external numbers such as mobile numbers.
One downside to this is that if the external number has voicemail enabled and the call isn't picked up, the voicemail will pickup the call from the queue breaking the queue's intended flow. To avoid this, use "Request Confirmation" to require the offnet agent to press 1 when answering calls in order for the call to be routed.